SPECIFICATION GENERATOR
Find out which low impact materials are right for your building project.
Air Tightness: The Beginners Guide
Find out more about how we approach this building scenario.
What is air tightness?
Air tightness essentially is a measure of how much air leaks out from the interior of a building when there is a pressure difference between the interior and the exterior. Now, that doesn’t mean that air only leaks out when someone is blowing air into a building or pushing air out of the building.
Wind actually is the main driver of pressure differences between the interior and the exterior, so when wind blows against one face of your house you get a positive pressure on that face that pushes into the building. On the opposite face of the building you actually have a negative pressure which is sucking air out of the building. So with any slight breeze even, you begin to get a pressure difference between the inside and the outside of the building and you begin to leak air out of your house.
Also, in winter, when you turn the heating on, heat rises. It builds up pressure in the upper rooms of a building and that draws in air at the bottom. So in the lower rooms in a building you’ll be drawing air in. You’ll have a lower pressure there, and again that produces a pressure difference even when there isn’t necessarily any wind blowing outside.
Why should we make buildings air tight?
The basic assumption is that air tightness is really only necessary for passive houses and that means it’s really hard work and not something that is applicable to an ordinary house. This is where air tightness is not well understood.
Air tightness and controlled ventilation losses account for 15 to 20 per cent of heat loss, so it’s a really significant amount of heat to lose from a building. By reducing ventilation losses (air leakage through the fabric of the building) you actually end up with much better air quality.
The warm, moist air that is in your building during the winter leaks through the walls, whether they are masonry or timber frame, it then condenses and increases moisture levels in the walls. That can cause mould growth and damp, which again can affect the internal air quality. So by reducing that you do actually end up with much better air quality, which is counter to what most people expect when they think of a building that is very, very well air sealed.
By reducing these draughts, you end up with much higher levels of comfort. You don’t get the draughts and the cool air down at ground level and the hot ceilings that you get during the winter with the heating on. You end up with a much more even temperature from floor to ceiling, so you avoid the cold feet and hot head issue that you often get in the winter.
The same happens in the summer. By preventing draughts and air leakage in the summer you can keep your house cool on extremely hot days. So during a heatwave if it gets up to 30+ degrees outside, the last thing you want to do is open all the doors and windows because you actually then let all that heat into the building. Ideally you keep the building closed down during the day and you open it up in the evening, so it then stays cool.
Finally, you reduce your heating and energy bills by making a building much more air tight. Your heating is not working so hard to replace all the warm air that’s leaking out of the walls and you keep the building at a much more even temperature.
Obviously you do need to ventilate the building properly. That though is generally done with a ventilation system, certainly in newer buildings, and they can also be installed into older buildings too. A mechanical ventilation system with heat recovery is really the only way that you can properly ventilate a building and ensure that you’ve got good levels of air quality all the way through the building.
Trickle vents in windows or just leaving any window open somewhere in the house is really not good enough to ventilate the whole building and provide good air quality throughout an entire house.
How do you actually make a building air tight?
With timber frame buildings you typically use membranes, or vapour control air tightness membranes and a lot of tape. The tapes are generally an acrylate adhesive, so it’s a clear adhesive (a very, very sticky material). We would specify the Ampatex Sinco or DB90 Vapour Control and air tight membranes to achieve those levels of air tightness.
You can use products like the Smart Ply Vap Air Tight, which is an air tight OSB board, so that gives you racking resistance. So it’s a structural board, plus the board is also air tight and so you simply tape the joints onto the board. This gives you a really air tight building as well.
And then finally you can use OSB3. Just use ordinary OSB3 for projects where the air tightness is less important but you still want to achieve reasonable levels of air tightness. When you’re jointing the membranes or the OSB boards, we’d normally recommend the Ampacoll XT which is an acrylate tape. It’s extremely sticky and sticks to any dry surface like clean timber, the boards or membranes. It’s a really good tape for joining any two items.
In terms of around awkward areas such as window and door reveals or internal corners, we tend to use a split back tape. That’s a tape which has the backing paper split into different widths so you can peel off one section, stick it to one area (such as a window frame) and then peel the rest of the backing off to stick it to the window reveal. This makes it a lot easier to actually use these tapes and use them effectively to make the junction air tight.
When you’re trying to seal around penetrations, butyl tapes tend to be a lot more useful. They’re very, very flexible and very, very sticky. You can also use them in areas where the moisture content is quite high, so low level externally plinth areas, and essentially you can stretch the tape out. It’s almost like chewing gum on a roll, so you put it on the pipe and then stretch it out and seal the junction around the base of the pipe.
We’d normally recommend the Ampacoll BK535 which is a fantastic tape. It’s the stickiest butyl adhesive I’ve ever come across, and also one of the stretchiest. It stretches out and makes it so easy to seal around pipe penetrations, cables, vents or ducts. It’s absolutely fantastic tape.
In masonry you tend to use plaster as your air tightness layer because you’ve got a solid wall and simply plastering it is enough to make it air tight. So you tend to use membranes less on masonry.
You still need to use them on roof structures, on the underside of roofs and on suspended floors, but masonry walls themselves you can actually stick with plaster. Taping around doors and windows and sealing it back against the masonry is more often than not, the job of the butyl tape.
We’ve got a product called Ampacoll F which is really thick stretchy butyl tape and goes around the outside of the window before you put it in. Once in situ, you can peel off the backing. It’s a double sided tape, and that allows you to stick it to the reveal of the masonry and gives you a really effective air tight seal.
How do you make existing buildings air tight?
Complete air tightness is not something that can be achieved by simply walking into a house and changing a few things. In existing buildings, it’s the seals around openings, appliances and those obvious things around your doors and windows that need addressing first.
However to actually make the building fabric itself air tight, you’ve really got to strip it back to the bare bones of the building. You’ve got to be able to get to a junction between your window, your door frame and your walls. You’ve got to get to the junction between your ground floor, walls, roof, and any junctions around floor joists or first floor joists, where they meet the wall or actually rest in the wall.
So air tightness is not something that’s terribly easy to do on an existing building, unless you actually are refurbishing the whole building and you’re going to strip it back, but it is perfectly possible.
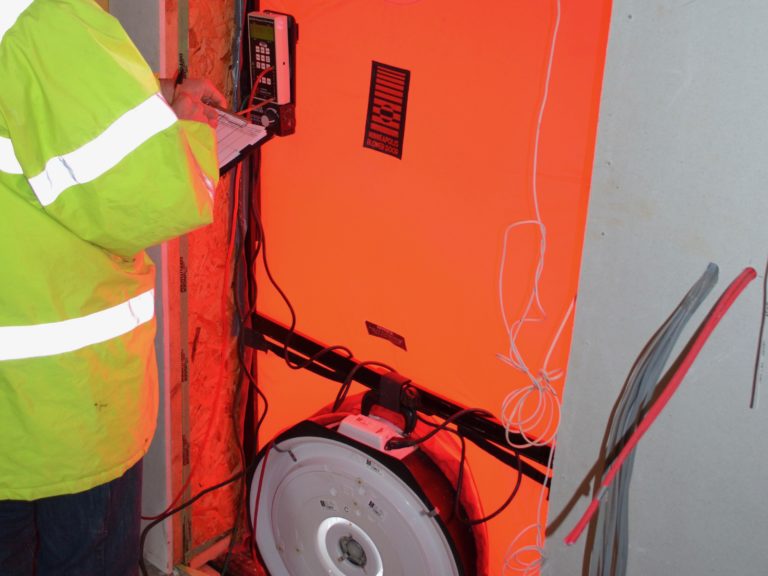
How do you measure air tightness?
Generally it’s done with what’s called a ‘blower door’ test. This involves putting a frame with a membrane in a doorway and in the middle of that membrane, placing a big fan. The fan blows air into the building and you then measure the air flow into the building. That’s called a positive pressure test and then you do a negative pressure test which is where the fan is sucking air out of the building to measure the air flow out of the building.
You then average the result for the two and that gives you the overall air tightness level of the building. When you’re doing air blow door tests, it’s actually really important to think through every single possible cause of air getting in or out of the building. There’s obvious ones such as flues or vents and the obvious things that you can see, but there’s plenty of things that are hidden that you also need to be aware of.
One of the biggest problems that we come across are non-return valves in waste pipes. A Durgo valve is one, which is an air admittance valve which allows air into foul drainage. Whenever you flush the loo it allows air to come in behind the water so you don’t get a vacuum forming.
There are also waterless traps, so Hep20 do a great space saving trap which goes in your sink or in your shower trap. It’s essentially a rubber membrane which seals again after the water’s gone through it, but crucially it doesn’t prevent air going out through it again in a positive pressure test. So that’s an important one to address.
You’ve also got things like the ventilation system. If you’re doing a new build or you’re putting a ventilation system into a building, you’ve got to tape up the intake and exhaust ductwork on the system.
There are then the obvious things like making sure all the windows and doors are actually locked so that you fully engage all the seals. Then there are traps. If you’ve got U-bends, you’ve got to make sure they are filled up with water. If you’re using the waterless Hep20 traps then you either tape up the actual trap itself or you can go and address it from the outside, by putting a drain bung in and preventing any air flow out through the main soil pipe.
What air tightness score do you actually need to achieve?
There are two different ways of measuring air tightness. There’s an n50 test and a q50 test.
N50 is a measure of the volume of air leakage at 50 pascals of pressure, so in the blower door test the fan either drops or raises the pressure in the building to 50 pascals above or below the external pressure. That gives you a result and it’s measured in air changes per hour. That’s generally used for passive house certification.
The UK building regulations require a slightly different test and that’s the q50 test. It’s a measure of the air permeability of the building fabric. It’s measured in cubic metres per hour per sq. metre. Again, when using the blower door test, you should look for a drop or rise in the pressure in the building of 50 pascals above or below the external pressure.
Generally the q50 is always required by building control even if you are building a passive house, but for passive house certification it’s actually only the n50 result that is used. For passive house certification you need to achieve an n50 of less than 0.6 air changes per hour. For UK building regulations you need to have a q50 of less than 5m3 per m2 per hour, which on average equates to a q50 of around 4.5 air changes per hour, which is not a particularly high target.
If you’re installing a ventilation system in a non-passive house building I’d suggest aiming for an n50 of around 1 air change per hour or a q50 of around 1.1m3 per m2 per hour.
If you have any further questions about this topic or sustainable building materials, please feel free to email at Chris@backtoearth.co.uk or alternatively give me a ring on 01392 861763.