SPECIFICATION GENERATOR
Find out which low impact materials are right for your building project.
Suspended floor insulation – How to install your wood fibre insulation
Here, using some simple 3d models, we look at how to correctly detail the insulation in your suspended floor so that you can be sure you will not get moisture or air leakage causing issues or damage.
Before you start insulating your floor, it is useful to know what other areas may need addressing. You can read more about insulating suspended floors and what is involved here. If you have a solid floor that needs insulating, see our information on solid floors here. Once you’re ready to start, read on…
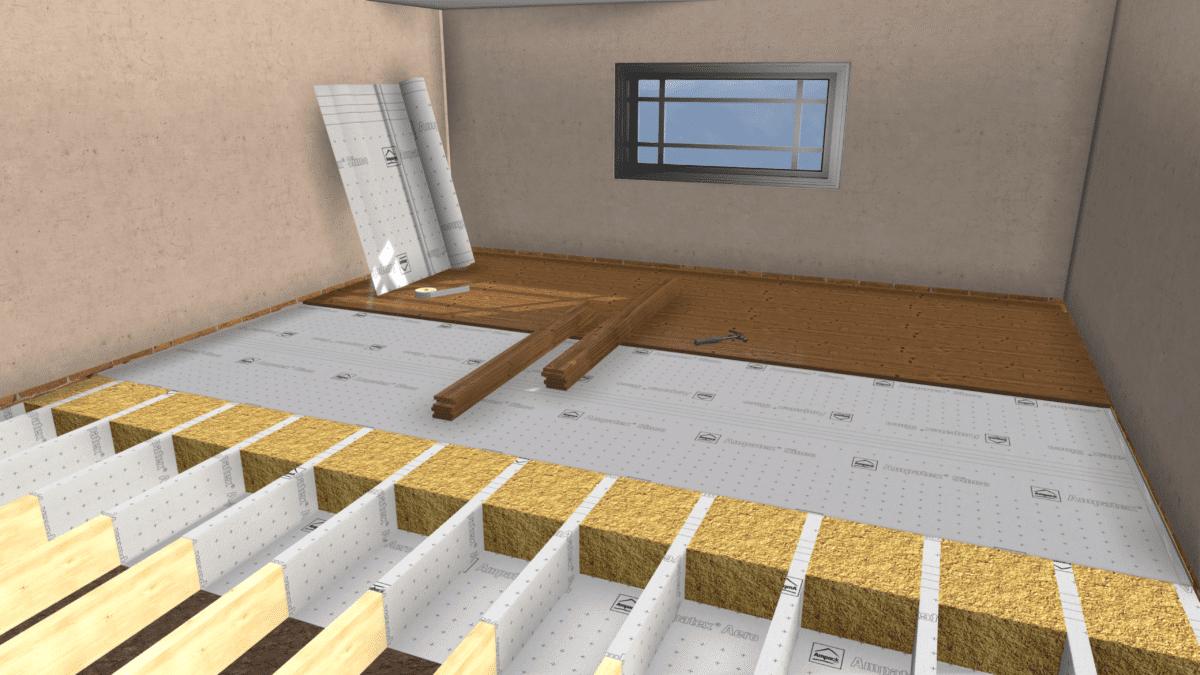
Installing insulation from above
(click on the models to allow 3D viewing, full screen icon bottom right)
Step One
To insulate your floor from above (the best way if you can lift up your floorboards), start by installing the Ampatop Aero or Protecta breathable membranes by draping between the joists, similar to a hammock. They can be stapled to the very bottom edge of the joists or you can use the Ampacoll DT tape to bond the membrane in place. This membrane should also be placed up against the masonry walling around the perimeter so that the insulation is not in direct contact with it. It should also have 100mm overlaps between each row of membrane, although taping is not strictly necessary.
Step Two
Once the breathable membrane is in place, the SteicoFlex 036 flexible wood fibre insulation can be installed by pressing into place between the joists. The insulation should fully fill the available depth (add more on top to fill and if cutting the width, ensure that the slabs are 10-15mm wider than the space being filled to ensure a good friction fit.
Step Three
Once all the insulation has been installed flush with the top of the joists, the Ampatex Sinco or Solero airtightness and vapour control membrane can be installed. This should be laid, wrinkle free, over the floor area and held in place using the Ampacoll DT double sided tape on the top of the joists. Leave some excess membrane around the perimeter so that there are laps extending 50mm or so up the walls. All joints should be taped with Ampacoll INT airtightness tape to ensure the floor is air tight.
Step Four
With the membrane in place, the floor boards can be fixed back down. The fixings will obviously puncture the membranes whilst doing this but will remain airtight so long as the fixings are not removed once installed so if a fixing misses a joist, leave it in place and install another. Once the floorboards have been installed, the membrane can be sealed to the walls around the perimeter using either the Ampacoll Fenax membrane sealing tape or the Ampacoll Profix airtight sealant.
Installing insulation from below
(click on the models to allow 3D viewing, full screen icon bottom right)
Start by lining the sides of the joists with a strip of Ampacoll DT double sided tape, placed close to the top edge of the joists. The Ampatex Sinco or Solero membrane can then be installed, wrinkle free, from below (writing face towards you) and held in place by the tape. Ensure the membrane is installed against the masonry around the perimeter so that the insulation is not in direct contact with the masonry. All joints should be well taped to ensure airtightness and the perimeter of the membrane should be sealed against the wall and left protruding down below the line of the floor by 50mm or so. This can then be sealed to the masonry with Ampacoll Profix sealant to provide an airtight seal to the perimeter.
With the Sinco or Solero membrane installed and sealed, the SteicoFlex 036 flexible wood fibre insulation can be installed from below. This should be friction fitted and fully fill the void between the joists. If cutting the batts, cut them 10-15mm wider than the gap being filled to ensure a good friction fit. The batts will hold in place for a while but not indefinitely so the breather membrane and battens should be installed in a timely manner after installation of the insulation.
Run strips of the Ampacoll DT double sided tape along the bottom of the joists and bond the Ampatop Aero or Protecta breathable membrane to this, ensuring 100mm overlaps as a minimum. The perimeter of the membrane can also be bonded back to the masonry with Ampacoll Profix sealant to avoid the edges drooping at a later date. Install battens at right angles to the joists if possible, right to the edges of the floor structure, to hold the membrane in place and support the insulation, at no more than 400mm centres.
How does this fit in with the rest of the building?
(click on the models to allow 3D viewing) Here you can see how the suspended floor insulation joins up with the internal wall insulation, how it goes through the first floor and how it meets the roof or ceiling insulation. If you have any questions about this installation, please call us.
Thanks for sharing these details. I’m looking to do this using the installation from above method. How would you best incorporate underfloor heating with this installation method?
Hi Ash
Underfloor heating can be laid between the joists by simply installing a thinner layer of the SteicoFlex which leaves enough space at the top of the bay between each pan of joists. The UFH trays should be laid over the top of the VCL membrane so that there is no heat loss from air leakage but other than that it is quite straight forward. If you want to run through this in more detail please feel free to give us a call. Hope that helps.