SPECIFICATION GENERATOR
Find out which low impact materials are right for your building project.
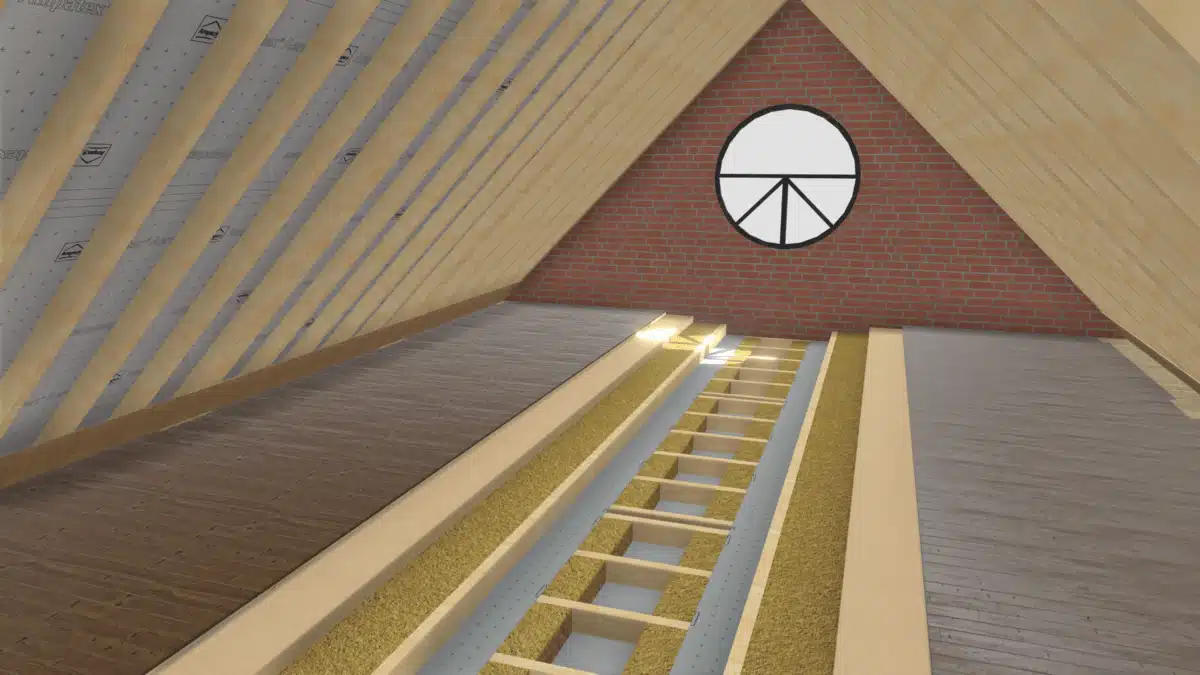
How to install your wood fibre loft insulation
Here, using some simple SketchUp models, we look at how to insulate your loft but maintain storage space above.
Here we run through the steps to create an airtight, well insulated loft space that you can still use for storage. It is really important to remember that if you’re planning on storing anything more than some lightweight items, you should get advice on the size of your ceiling joists and what loads they can safely take. It may be necessary to increase the number and/or depth of the ceiling joists to accommodate this before insulating your loft.
The specification you’d use would be as follows:-
Loft Space
22mm chipboard flooring
50mm battens
60mm wood fibre sarking board
100mm timber battens, laid perpendicular to joists, fully filled with SteicoFlex 036 flexible wood fibre insulation
Existing ceiling joists, fully filled with SteicoFlex 036 flexible wood fibre insulation
Ampatex Sinco vapour control and airtightness membrane, laid up and down between existing ceiling joists, joints taped with Ampacoll INT airtightness tape
Existing plasterboard ceiling
Interior
With that in mind, here’s how we suggest you put it all together:-
Step One
(click on the models to allow 3D viewing, full screen icon bottom right)
The first step is to fix an OSB board to the underside of the rafters. Start by cutting a sheet of OSB down the middle so that you have 2 pieces of 2400 x 600mm and then this should be cut around the ceiling joists so that it slots down to meet the ceiling boards at the bottom of the ceiling joists.
Tape the junctions with the ceiling joists with the Ampacoll Fenax 40/60 tape to make the panel wind-tight.
Step 2
Next, install the insulation and airtightness membrane.
Fit the SteicoFlex 036 flexible wood fibre insulation between the joists so that they are filled level with the top of the joists. Next, fit a layer of Ampatex Sinco airtightness and vapour control membrane over the insulation.
Apply strips of Ampacoll DT double sided tape to the top of the joists and bond the membrane, free of creases, to the surface of the joists. Each row of membrane should overlap the adjacent rows by a minimum of 100mm and all joints should be taped with the Ampacoll INT airtightness tape. The perimeter of the membrane should be sealed against the OSB boards and any masonry walling with the Ampacoll Fenax 40/60 membrane edging tape.
Step 3
The next step is to install another set of joists over the existing ones and add more insulation.
Screw 100 x 47mm joists perpendicular to the existing joists and set them at 600mm centres. Ideally keep them around 300mm from the OSB boards under the rafters so that there is space to add more over the top and screw it in place.
Lay the SteicoFlex 036 flexible wood fibre insulation into the void between the new joists, again making sure it fills to the tops of the joists.
Step 4
The final step is to add the wood fibre boards and the flooring above.
Lay the wood fibre sarking boards, such as the Beltermo Ultra, Steico ProtectDry or Pavatex Isolair, running perpendicular to the new joists (parallel with the old joists) and lightly fix with 2 screws per board. Mark the position of the joists on the surface of the boards to make fixing the counter-battens easier. Ensure all of the T&G joints are firmly connected with no gaps between the boards and that the edges of the boards are as close to the perimeter as practicable.
Once the boards are installed, to achieve the best levels of airtightness, the perimeter should be taped again with the Ampacoll Fenax 40/60 tape. Alternatively, any gaps can be filled with offcuts of the SteicoFlex material by firmly pressing it in and fully filling, level with the top of the boards.
Once the boards have been installed, screw the counter-battens down, through the wood fibre board and at least 40mm into the joists below. Once secured, T&G chipboard flooring or timber floor boards can be fixed down to the battens.
How does this fit in with the rest of the building?
(click on the models to allow 3D viewing)
Here you can see how the suspended floor insulation joins up with the internal wall insulation, how it goes through the first floor and how it meets the roof or ceiling insulation. Obviously the floor buildup above is solid but the Ampatex Solero membrane will still be bonded to the surface of the wood fibre insulation in the walls as shown.
If you have any questions about this installation, please call us.