PRODUCT SEARCH
Find high performance, low impact materials for your building project.
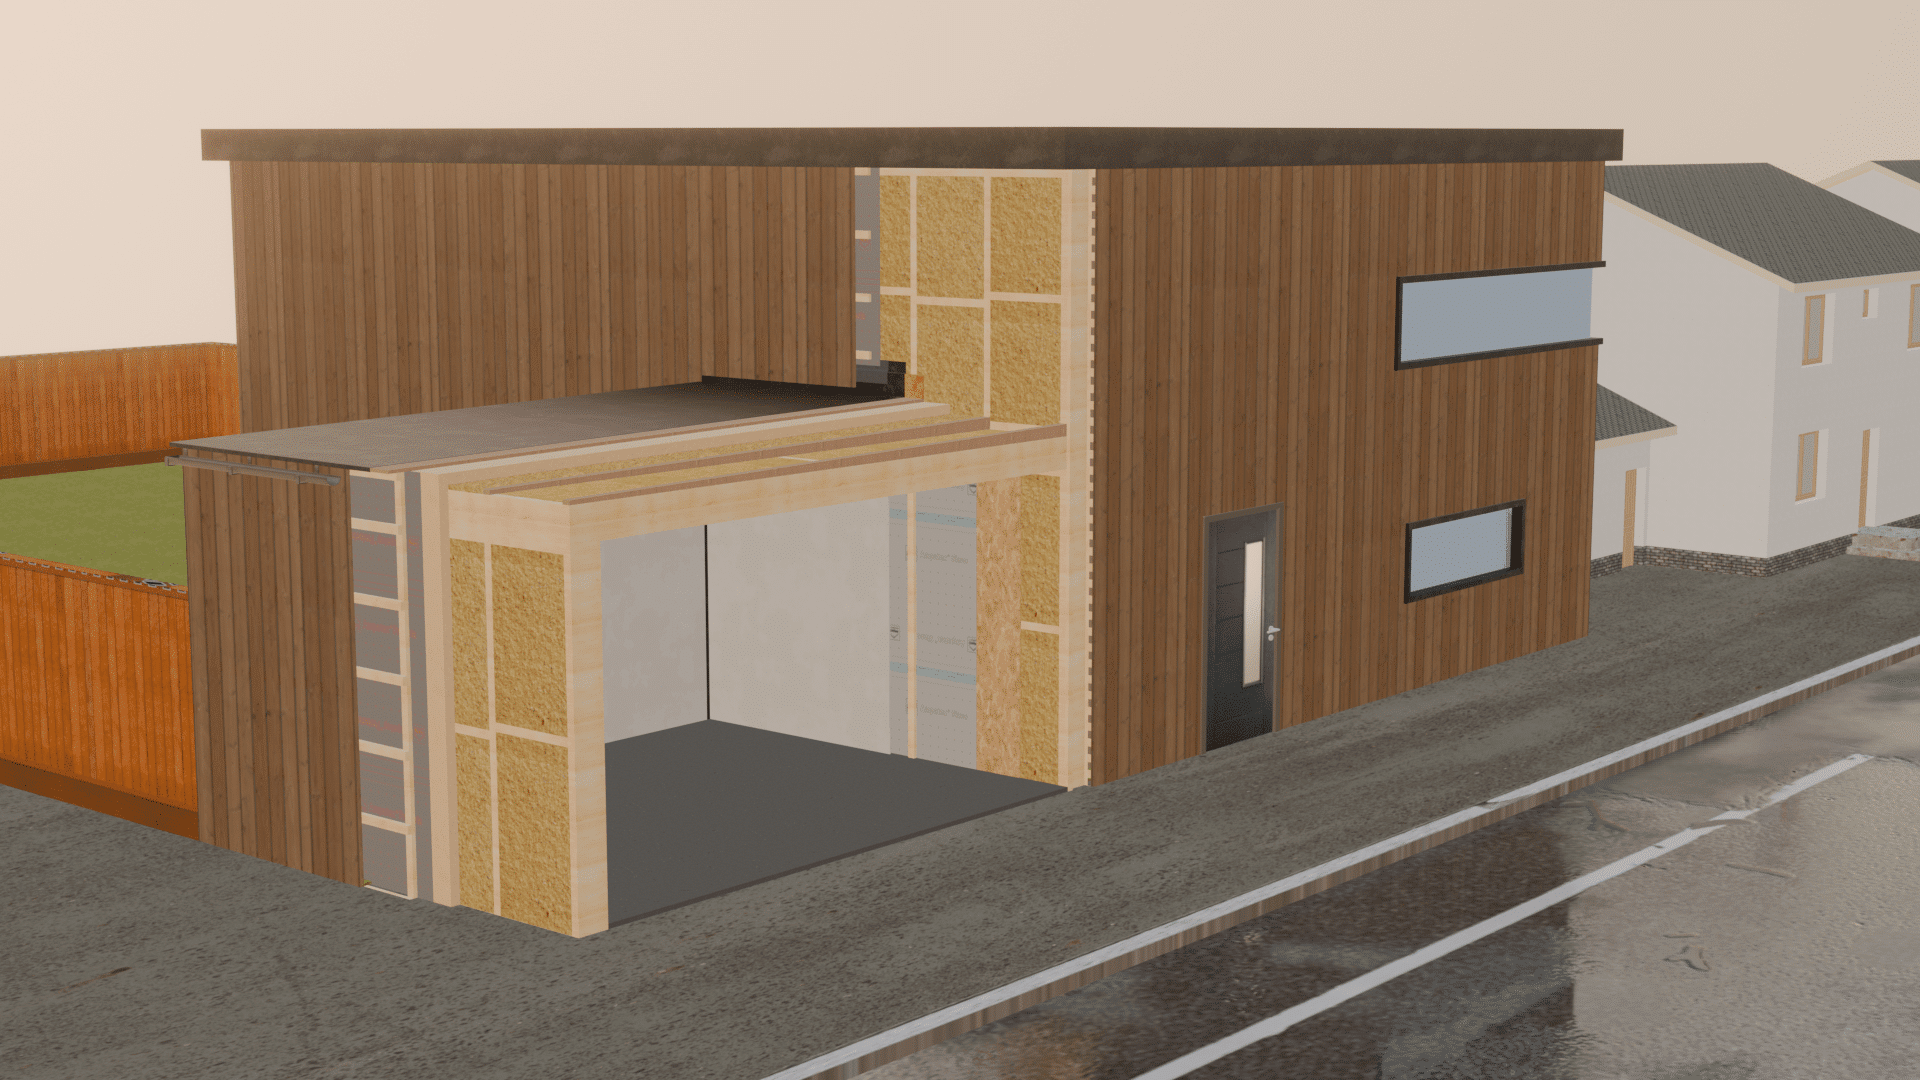
How to insulate a flat roof with wood fibre insulation
In this guide we look at how to insulate a flat roof, whether it is a new roof or whether you’re insulating an existing structure. We start with insulating new flat roof constructions and move on to insulating existing roofs towards the end of the article.
This guide is for roofs with a typical pitch of less than 10 degrees, whether ventilated or unventilated. If you have a pitched roof construction, please look at our pitched roof installation guide or contact us for more details.
To find out exactly what materials are required for this process, if you don’t know already, please visit our Specification Generator. This tool will give you a full specification based on the U-value and joist size requirements you have. If you’re still not sure, please contact us for more information.
We start with looking at new structures but if you’re wanting to find out about insulating existing roofs, please click the link.
Creating new roof structures.
For both ventilated and unventilated roof structures, the initial build-up is the same. Assuming you have your joists installed level, you will next need to install your furrings directly on top of (and running parallel with) your joists. Then, install the Fermacell boards to the underside of the joists and protect from the weather as much as possible.
Step 1
(Click play to activate the model, click the numbers for the annotations, full screen icon bottom right.)
The SteicoFlex flexible insulation can then be installed between the joists and finished flush with the tops of the furrings. Make sure that the insulation is flush with the top and leaves no cavities as any gaps reduce the thermal performance of the overall roof construction. You may need to pack in more insulation and then cut it back so that it follows the line of the furrings to achieve this.
If the roof is large then it would be worth doing this in sections so that if it rains, you can keep it relatively dry before fitting the wood fibre boards above.
Step 2
Lay the wood fibre sarking boards over the top of the furrings using the typical brick-bond pattern. Start by laying the boards with the T&G profile overhanging the edge of the roof. Once in place, the profiled edges can be removed with a power saw so that the edge of the boards is square along the perimeter of the roof.
Lay the boards in straight rows, making sure the joints are tight with less than 2mm gaps and make sure the joints on the short edges of the boards are staggered by at least two joists. What is cut off the end of the first row can be used to start the second row and so on.
Once the boards are in place, use weather protection to prevent rain ingress and although it may be tempting to walk on the wood fibre boards, we would recommend using timber boards over the top to prevent installers falling though the roof.
From here on in, the build-ups begin to vary between ventilated and unventilated roofs. For unventilated roofs, please move on to Step 3 – Unventilated below but for ventilated, please see Step 3 – Ventilated.
Step 3 – Unventilated
With the unventilated roof structure, the next step is to lay the ply (or board recommended by roof covering manufacturer) down directly on to the surface of the wood fibre boards, ensuring good contact, then to fix them down to the joists/furrings. Ensure the fixings have at least 40mm penetration into the timber and T&G ply is best to avoid joints becoming visible in the roof finish.
It is important not to over tighten the screws as this will cause dips in the roof surface which will be seen once the covering is applied.
Note the junction where the roof meets the wall and how this is detailed. If the detailing needs to be different for your scenario, please contact us to discuss how best to achieve this junction.
Step 4 – Unventilated
If the roof has become wet during rain, the outer surface must be left to dry before application of the roof covering. Once dry, the roof covering can be applied to the surface of the boards, ensuring that the roof falls towards the gutters and that no water remains standing after rain. Once installed, it is important that the surface of the roof is not covered or shaded by anything, as this will impair the functioning of the roof.
On the interior of the roof, once the structure is dry (if it has become wet during installation), the Ampatex Variano variable vapour control membrane can be installed. Apply strips of Ampacoll DT double sided tape to the surface of clean, dry Fermacell boards and bond the membrane, free of creases, to the surface.
Each row of membrane should overlap the adjacent rows by a minimum of 100mm and all joints should be taped with the Ampacoll INT airtightness tape. The perimeter of the membrane should be sealed against any masonry walling with the Ampacoll Fenax 40/60 membrane edging tape.
The next step is to install the battens, which should have the Ampacoll ND Band stuck to the face that presses against the membrane. Fix the counter-battens using screws or nails and if the fixing is in the wrong place, do not remove it and instead, add another in the correct place. The reason for this is that the fixings puncture the membrane and removing fixings creates holes in the membrane which allow air and moisture leakage into the roof structure. Once complete any electrical services can be fixed to the sides of the counter-battens in conduit.
If you are adding SteicoFlex 036 flexible wood fibre insulation between the counter-battens, we suggest you press it in between the counter-battens and then use strips of plasterboard scrim tape, stapled to the underside and spanning between the counter-battens, to hold in place until such time as the plasterboard is fitted. At 25mm or 40mm the insulation is much more floppy than the thicker slabs and so is more difficult to keep in place.
Finally, plasterboard the underside with standard plasterboard. Foil-backed plasterboard must not be used.
Step 3 – Ventilated
In this scenario, once the boards are fitted the breathable membrane is laid on top.
On to clean, dry boards, firmly apply strips of Ampacoll DT double sided tape to the top of the boards at roughly 1 metre centres, or closer if it is windy. Next, lay the Ampatop Protecta breathable roofing membrane in wrinkle free rows on to the surface of the boards and firmly press down on to the double sided tape, making sure the membrane reaches the ends of the rafter trays. This tape is a temporary mounting aid, not a permanent fixing so apply the membrane, tape and counter-battens as soon as possible after.
Ensure there is a minimum overlap of 100mm between each row and seal all of the horizontal and vertical joins with Ampacoll Flexx Pro external air tightness tape. Joist positions should be transferred from the wood fibre boards to the surface of the breathable membrane to enable confident installation of the counter-battens. This can be done simply with a builder’s pencil or permanent marker.
Once the membrane installation is complete, install the 50mm counter-battens on to the surface of the roof. Use fixings at 300mm centres along the counter-battens with the screws running straight down (perpendicular) in to the rafters with at least 40mm penetration into the joists/furrings.
The counter-battens should be pulled firmly against the surface of the roof, such that the battens lay flat but tight against the membrane so that rain cannot penetrate under them. If you look up the length of the counter-battens and they are rising and falling they are too tight against the surface.
If rain is likely to penetrate the roof covering regularly, such as using tiles or slates on a low pitched roof or in a very exposed area, use the Ampacoll ND Duo nail sealing tape on the back of the battens before installing to prevent moisture from penetrating behind battens, through the breathable membrane.
Counter-battens should be at least 50mm thick and sometimes more to comply with the relevant BS standards. Please see BS 6229 for further guidance – ‘Ventilation openings should be provided to every roof void along two opposite sides of the roof and should be equivalent in area to a continuous opening of not less than 25 mm at each side. For large roofs greater than 5 m in span, a cold flat roof (with flexible waterproofing coverings) should not be used (see BS 6229 for further guidance). For large span (from 5 m to 10 m), fully supported flat sheet metal roofs a verge to verge cross ventilated void with minimum 100 mm depth should be provided together with an edge ventilation gap of not less than 60 mm’.
Step 4 – Ventilated
T&G ply boards (or boards recommended by roof finish manufacturer) can now be fixed down to the battens, ready for the laying of the roof finish.
On the interior of the roof, once the structure is dry (if it has become wet during installation), the Ampatex Variano variable vapour control membrane can be installed. Apply strips of Ampacoll DT double sided tape to the surface of clean, dry Fermacell boards and bond the membrane, free of creases, to the surface.
Each row of membrane should overlap the adjacent rows by a minimum of 100mm and all joints should be taped with the Ampacoll INT airtightness tape. The perimeter of the membrane should be sealed against any masonry walling with the Ampacoll Fenax 40/60 membrane edging tape.
Once installed, fix the counter-battens using screws or nails. Should the fixing be in the wrong place, do not remove it and instead, add another in the correct place. The reason for this is that the fixings puncture the membrane and removing fixings creates holes in the membrane which allow air and moisture leakage into the roof structure. Once complete any electrical services can be fixed to the sides of the counter-battens in conduit.
If you are adding SteicoFlex 036 flexible wood fibre insulation between the counter-battens, we suggest you press it in between the counter-battens and then use strips of plasterboard scrim tape, stapled to the underside and spanning between the counter-battens, to hold in place until such time as the plasterboard is fitted. At 25mm or 40mm the insulation is much more floppy than the thicker slabs and so is more difficult to keep in place.
Finally, plasterboard the underside with standard plasterboard. Foil-backed plasterboard must not be used.
Insulating existing roofs
(Click play to activate the model, click the numbers for the annotations, full screen icon bottom right.)
To insulate existing flat roofs, please contact us first to discuss whether this is a possibility as there are scenarios where it is not possible to safely insulate an existing uninsulated or poorly insulated flat roof We can also give you a specification or U-value for the finished roof.
Assuming we’ve recommended you insulate the roof, the first step is to install the UdiTHERM NF wood fibre boards between the joists, firmly up against the existing boarding. These should be cut as accurately as possible to fit very snugly between the joists and they should be held in place with small screws/nails, angle fixed into the joists so that the boards do not drop down. If the fit of the boards is tight enough for them not to drop out then the fixings can be omitted.
Connect each piece of UdiTHERM NF using the T&G profiles to create a continuous layer, firmly pressed against the underside of the deck. Next, install the SteicoFlex flexible wood fibre insulation between the joists by pushing firmly up against the UdiTHERM NF boards. If the insulation is being cut, make sure you cut it 10mm or so wider than the gap between the joists so that the void is fully filled.
The joists should be fully filled with SteicoFlex to the point that the insulation protrudes slightly. It is better to slightly over-fill than under-fill the void. However, too much will prevent easy installation of the membrane so excess should be trimmed off with a saw.
Next, install the Ampatex Variano variable vapour control membrane to the underside of the joists. This can be achieved by running strips of Ampacoll DT double sided tape to the underside of the joists and firmly pressing the membrane against this to hold it in place. Staples can be used along the joints if required, so long as they are taped over. Tape all of the joints with the Ampacoll INT internal airtightness tape and the perimeter of the roof should be taped to the walls with Ampacoll Fenax tape, to ensure continuity.
Once the membrane is in place, install the 10mm Fermacell boards.The boards should be fixed at 150mm centres with standard drywall screws. During fixing, if you miss the joist with a fixing, leave the screw in place rather than remove it as otherwise you will leave a hole in the membrane which will allow air to pass into the structure.
Next install the counter-battens, ensuring 40mm penetration of the screws into the joists, and fixing any wiring in conduit to the sides of the battens. If you are adding SteicoFlex 036 flexible wood fibre insulation between the counter-battens, we suggest you press it in between the counter-battens and then use strips of plasterboard scrim tape, stapled to the underside and spanning between the counter-battens, to hold in place until such time as the plasterboard is fitted. At 25mm or 40mm the insulation is much more floppy than the thicker slabs and so is more difficult to keep in place.
Finally, plasterboard the underside with standard plasterboard. Foil-backed plasterboard must not be used.
If you have any questions about this installation, please feel free to contact us. Return to the Top
Hi, I have looked at your guide to insulating an existing flat roof, which is helpful, though it describes the process working from the inside. We have been asked to insulate from above. We are removing a felt flat roof (felt is beyond its useful life) and wanting to build up the flat roof and insulate from above, leaving the existing plasterboard ceiling intact above the bedrooms. Do you have a build up for working that way? We want to use eco breathable materials like the woodfibre, but the roofer – who is doing the final layer – only wants to use felt (which isn’t breathable). Is this a problem?
many thanks
Andrea (07906 575005)
Hi Andrea
Thanks for your comment.
You can install the materials for a vented roof structure from the exterior but you’d need to install the membranes in the same way that we suggest in our pitched roof guide here – https://www.backtoearth.co.uk/guide/how-to-insulate-a-pitched-roof-using-wood-fibre-insulation/ Once the membrane is in, the build-up is quite simple. However, this would need to be a ventilated roof (e.g. with a 50mm battened ventilated gap above the wood fibre boards) and cannot be done as an unvented roof structure because of the difficulty of installing the membrane and it’s position within the roof when installed from outside.
Hope that helps.