PRODUCT SEARCH
Find high performance, low impact materials for your building project.
LithoGlas – Solid floor insulation with underfloor heating – How to create a solid, insulated floor
Here, using some simple 3d models, we look at how to create a solid, insulated, ground floor without the use of a concrete slab, finished with the Lithotherm underfloor heating system.
If you’re looking for suspended floor insulation, please go to our page on suspended floor insulation here. Otherwise, read on…..
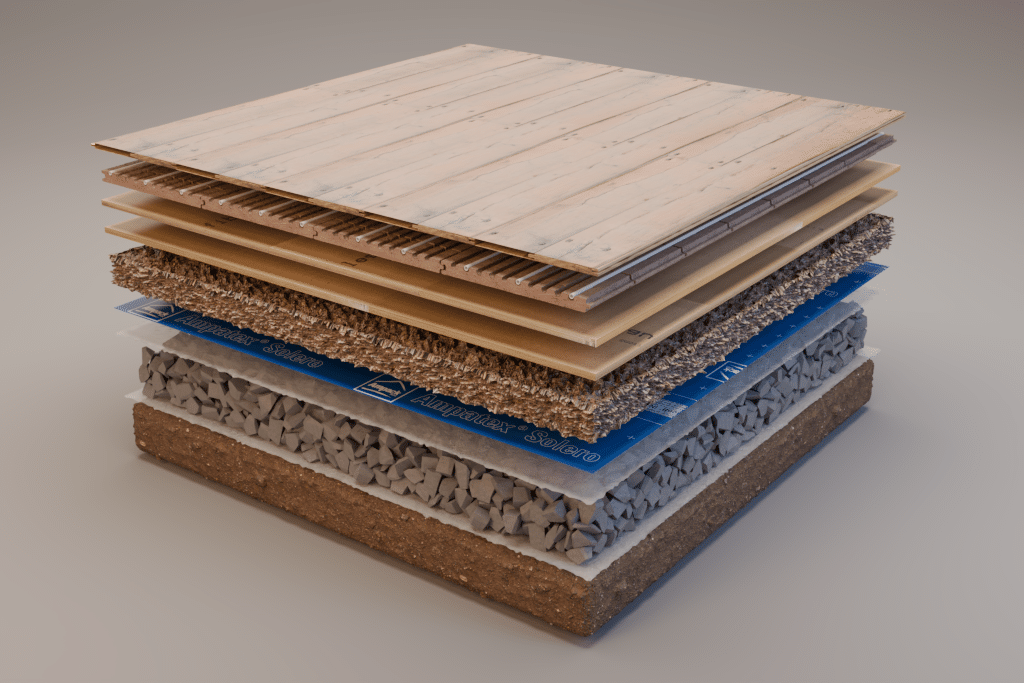
The floor build-up
(click on the models to allow 3D viewing, full screen icon bottom right)
This build-up can be used to replace a standard solid floor construction using a concrete slab and PIR insulation and creates a free draining, re-useable floor structure that is completely dry and can be finished immediately. This makes it ideal for projects where time is of the essence or where lots of timber is present that needs to be kept dry.
The actual specification for the floor build-up would be as follows:-
- Interior
- Floor finish
- 45mm Lithotherm underfloor heating tiles
- Two layers of NaturHeld 20mm square-edge high density wood fibre boards, joints staggered.
- Min. 30mm levelling layer of Cemwood CW2000 insulating levelling aggregate, adjust thickness to obtain correct levels
- Ampatex Solero weather resistant vapour control layer membrane, (all joints taped with Ampacoll Flexx Pro airtightness tape), membrane sealed around service penetrations.
- Geotextile membrane
- 250mm (compacted thickness) FG40 Foamglass Aggregate
- Geotextile membrane
- Ground
So, on to the installation, starting with the Foamglas aggregate. This is installed to the required thickness to achieve the building control target, typically between 200 – 250mm (contact us for a definitive specification).
The first layer of geotextile is laid over the bare soil and pinned in place before the foamglass is poured in over the top.
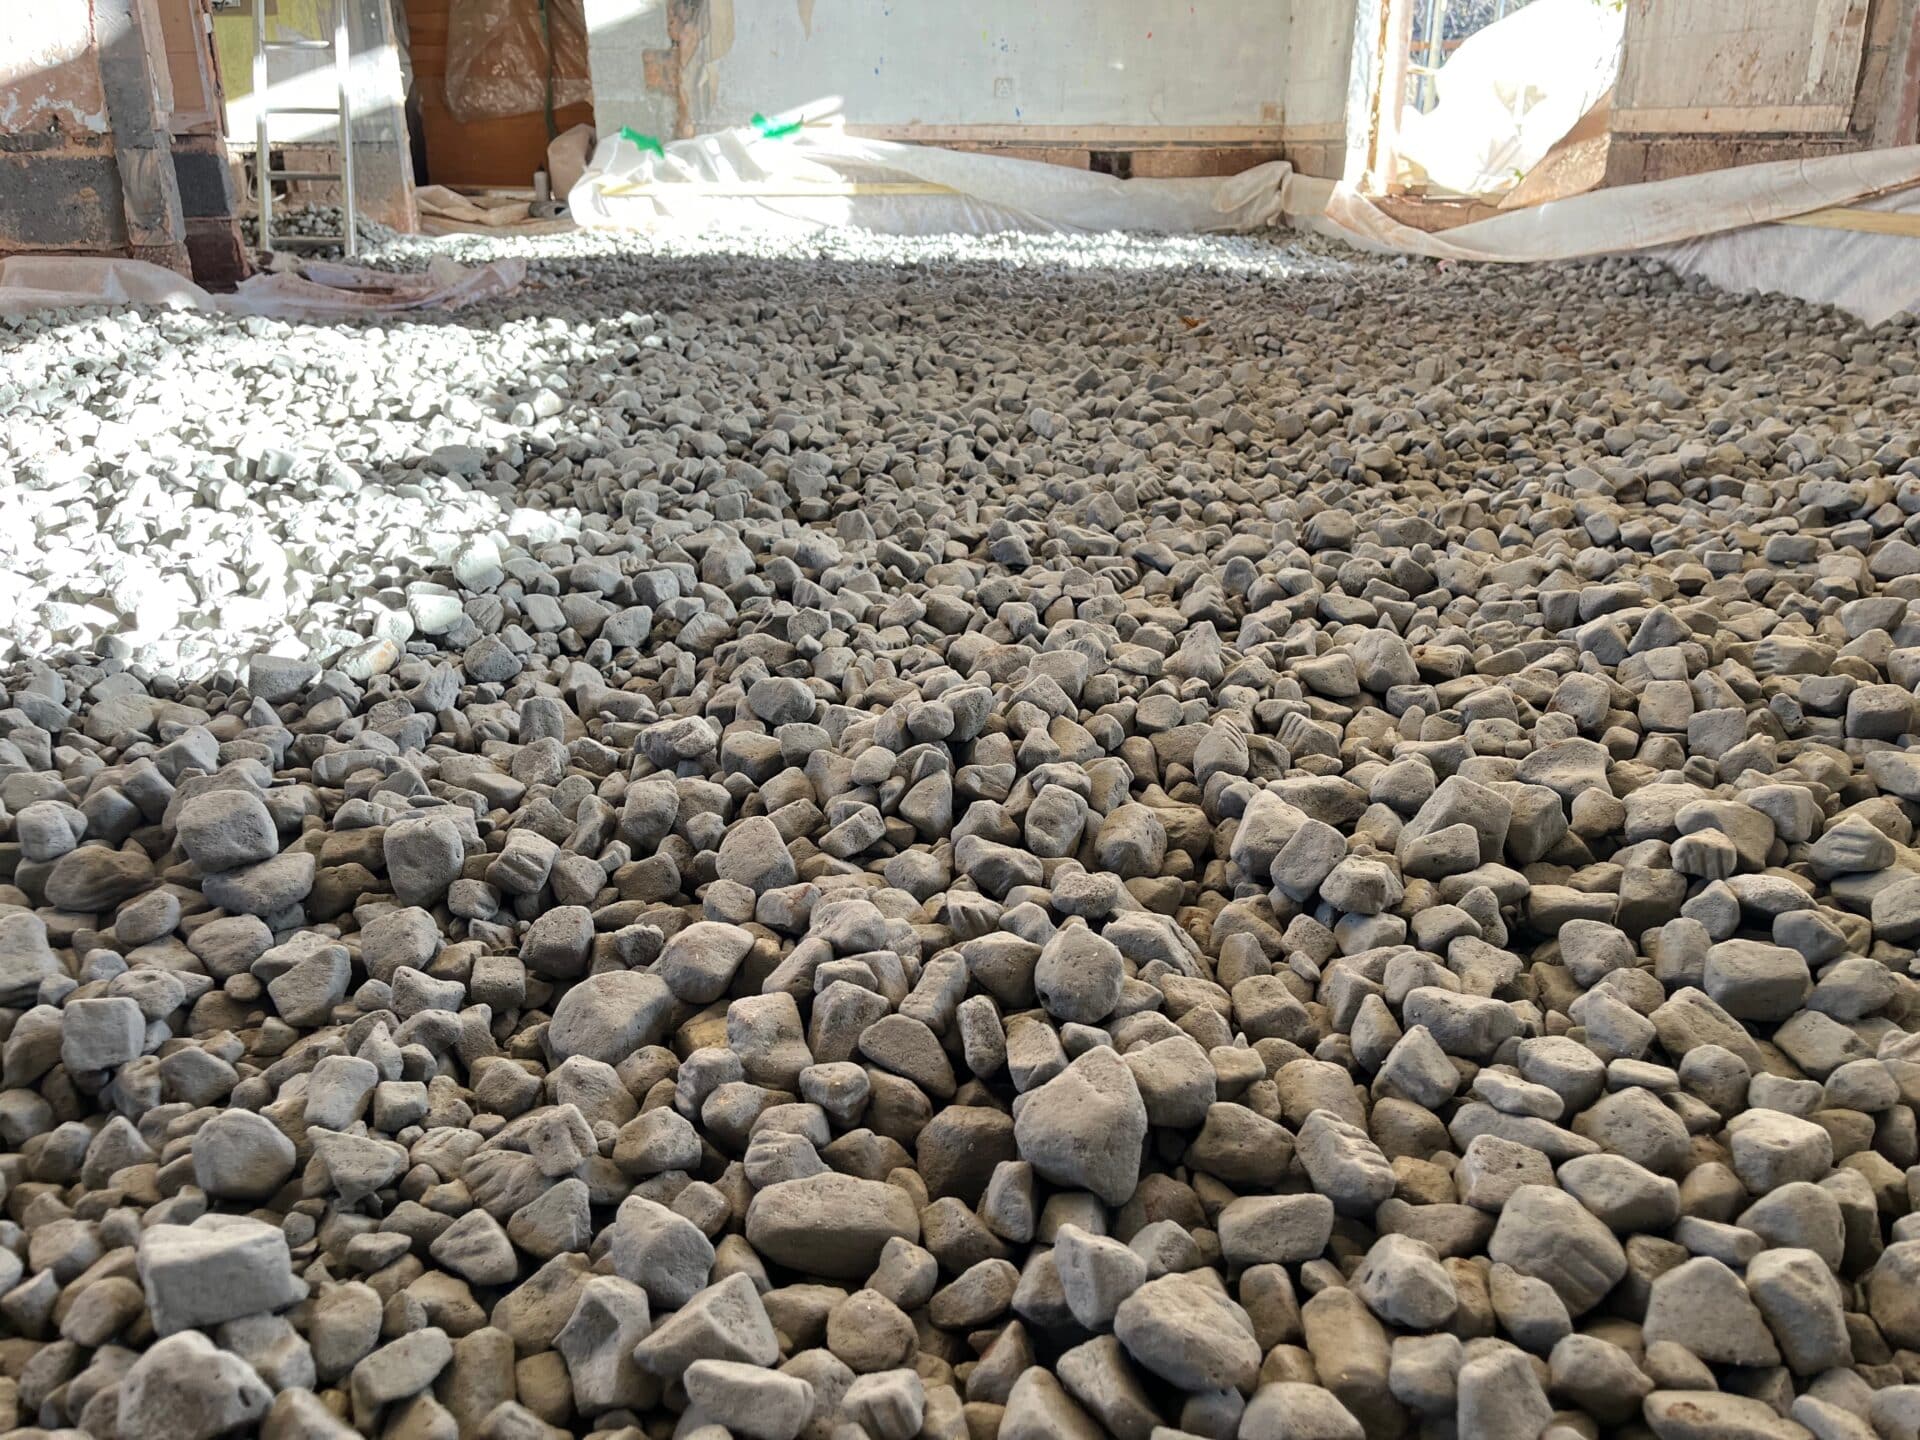
Rake the foamglass to an approximate level and then compact with a plate compacter.
You can add additional thin layers of the FG40 product over a compacted layer and compact again to get as close as possible to the desired level.
It is difficult to get this perfectly level so, once you are within 10mm or so of your target level, we recommend installing the second layer of geotextile membrane over the compacted foamglass and then installing the Ampatex Solero membrane. In Radon areas this would need to be substituted with the Sisalex 871 Radon Barrier membrane.
To level the Cemwood layer, set up rails/pipes with a laser level to the correct level and fill between with cemwood. Using a straight-edge/screed beam to screed/scrape between the rails, levelling the cemwood as you go. It is usually best to work from the edges of a room towards a door.
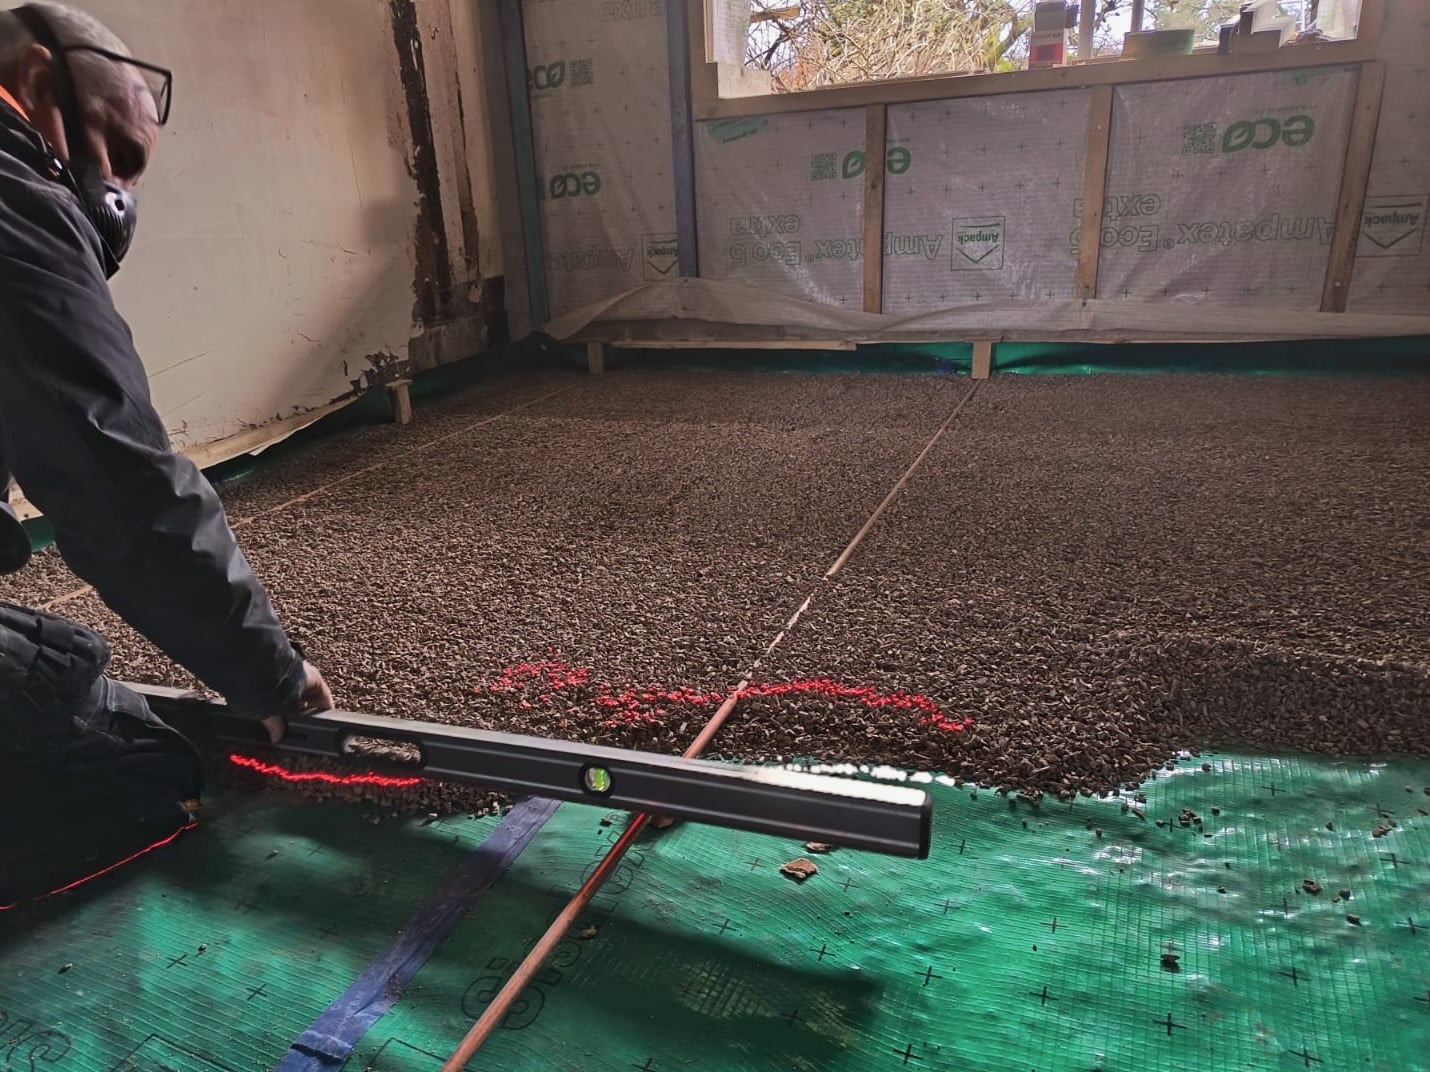
Once complete, remove the rails and start laying the two layers of square edged boards, ensuring the joints are staggered between the layers to spread any load. Start from the doorway and work towards the edges of the room and do not stand directly on the Cemwood.
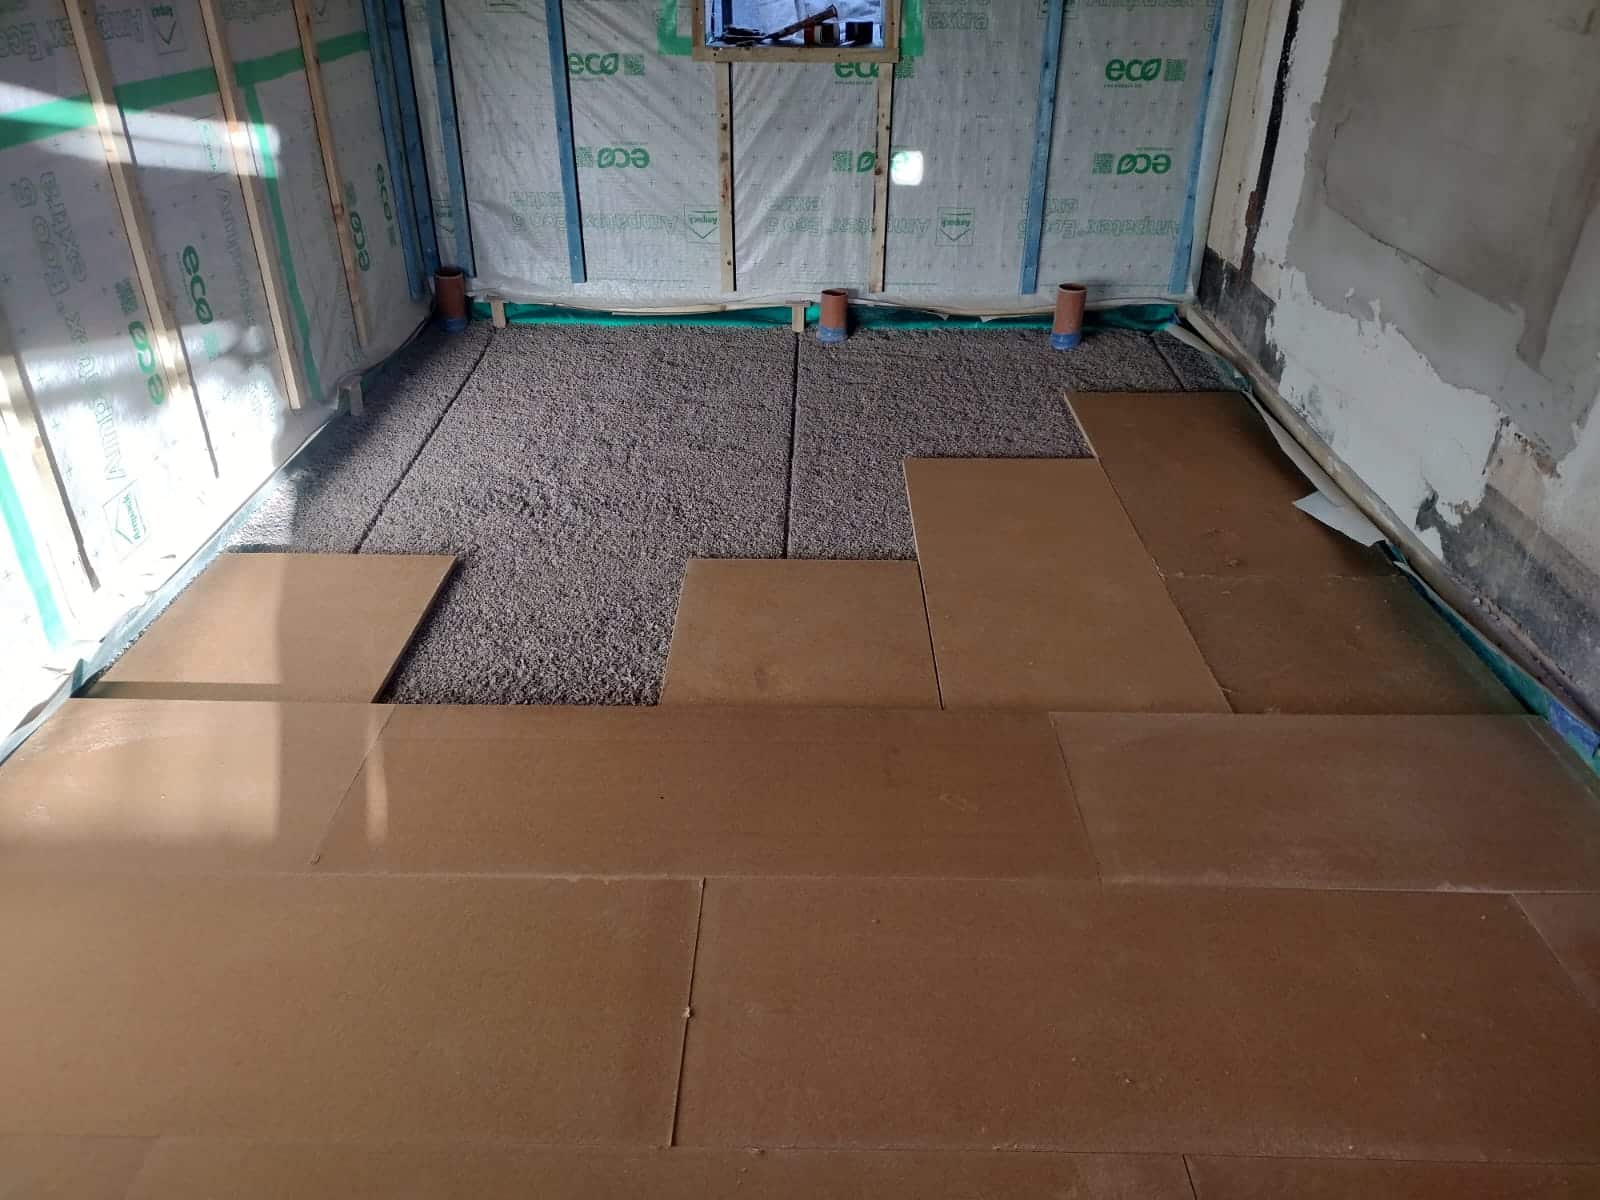
These boards form a flat, clean base for the Lithotherm underfloor heating tiles and also provide the additional benefit of absorbing sound from the tiles, making the floor much better at absorbing impact vibration.
Once the wood fibre boards are in place the Lithotherm tiles can be laid and the pipes installed using the following procedure:-
- Starting with a full tile placed 100-120mm away from the wall perpendicular to the grooves and abutting the perimeter insulation on the edge parallel to the grooves, lay the Lithotherm tiles in rows with the tiles firmly butted up to each adjacent tile.
- The second row should start with a half tile, connecting the T&G connection with the row adjacent to it, to create a brick bond pattern. Generally the rows should proceed across the floor in such a way that space is left to be able to install the last 5-6 rows , one tile at a time in a diagonal line, to prevent the installer having to walk on the tiles.
- Rows should be finished in such a way that the brick bond pattern is maintained and the 100-120mm gap is left against the wall perpendicular to the grooves.
- The tiles should not be walked on during installation, except by the installer and only when necessary. Lay boards over the tiles to prevent damage if access is required.
- Once complete, the pipes can be installed in loops of around 100m (roughly equivalent to 10m2 of tiles). The pipe should run from the flow side of the manifold to the tiles and be laid in every 4th groove, starting with the first. Pipes can be bent by hand at the end of each run.
- Once the 50m point is reached on the pipe (identified by the length markings on the sidewall of the pipe) then the pipe should return in between the first set of pipes laid, at the same spacing, so that once complete every second groove is filled.
- Once all the pipework is installed and pressure tested fill the voids around the perimeter of the tiles, including the pipework, with a dry-mix cement screed, flush with the surface of the tiles.
- If an engineered timber floor finish is to be laid, this can now be installed, or if tiles are to be used, proceed as below.
- Lay Lithotherm reinforcing mesh over the entire surface of the floor and bond to the surface of the tiles with a 3mm layer of flexible tile adhesive. Any adhesive conforming to BS EN 12004 C2TE is suitable. Ensure 100mm laps on the mesh at all joints.
- UFH system must be off and at ambient internal temperature during laying of mesh and adhesive to allow correct curing of the adhesive.
- Once cured in line with the adhesive manufacturers guidance the surface is suitable for receiving tiles as per tile manufacturers guidance.
For more information on installation please contact us or see the online installation guide at https://www.youtube.com/watch?v=yxZhFy46BC4.
How does this fit in with the rest of the building?
(click on the models to allow 3D viewing)
Here you can see how the suspended floor insulation joins up with the internal wall insulation, how it goes through the first floor and how it meets the roof or ceiling insulation. Obviously the floor buildup above is solid but the Ampatex Solero membrane will still be bonded to the surface of the wood fibre insulation in the walls as shown.
If you have any questions about this installation, please contact us.
Thank you for this interesting guide. Are there any considerations for the types of flooring used in this system? You mention engineered timber flooring and tiles, but are their any factors such as thickness of engineered timber floor or type of tile (e.g. porcelain)?
Hi James
The flooring finishes make a big difference to the heat output. If you download the heat output charts you can see the difference between ceramic tiles and timber but and the thickness of the timber will have some bearing on the output but these charts don’t specify exactly what thickness of timber has been used. However, the differences in output between 10 and 20mm timber and between 5 and 15mm tiles will be minimal as neither is particularly insulating.
Hope that helps.