SPECIFICATION GENERATOR
Find out which low impact materials are right for your building project.
NatureWall Internal Wall Insulation – Wood fibre insulation with a plasterboard finish
In conjunction with Red Co-Op in Manchester, we’ve created a system to make insulating your walls easier. Here, using some simple 3d models, we look at how to install NatureWall wood fibre internal wall insulation with a plasterboard finish.
For more detailed installation guidance, please run through the free course on our Fibres Academy training platform.
It isn’t always possible to find installers who are able or comfortable with installing lime plasters over wood fibre internal wall insulation, which can be a barrier to use. Using the below steps, we guide you through installing the plasterboard finished NatureWall internal wall insulation to reduce the amount of ‘wet’ work involved with internally insulating.
Contrary to what some believe, plasterboard and gypsum plasters are just as breathable as the most permeable of lime plasters and so is perfectly useable on this type of construction. When painting the plastered surface once it has been skimmed, you should only use acrylic or other breathable paints and no vinyl paints.
Starting with the materials, this is what you’ll need:-
- Baumit Viton Fein – Levelling plaster for bare masonry walls.
- UdiTHERM wood fibre internal insulation boards.
- Fischer Termoz insulation fixings – specialist insulated fixings to prevent thermal bridging through the fixings.
- 20mm Reveal boards – for insulating window/door reveals.
- Ampacoll Komprimax joint sealing tape – for sealing between reveal boards and window/door frames.
- Ampacoll Fenax edging tape – plasterable airtightness tape used for sealing around any penetrations such as joists or vents.
- Ampacoll INT airtightness tape – for sealing the laps and joints in the membranes
- Ampatex Variano or Ampatex LDA 0.02 membranes – depending on which we’ve suggested.
- Fischer SXRL or DuoExpand fixings – for fixing battens to the masonry walls.
- SteicoFlex flexible wood fibre insulation – for insulating between battens.
- Plasterboard and accessories.
- If the base of the wall is level with or close to the external ground level, you should use a layer of Multipor mineral insulation boards bonded to the wall to avoid any issues with moisture.
The actual specification would be as follows:-
Existing walls,
5-10mm Baumit VitonFein clay plaster to level walls, if required
UdiTHERM wood fibre insulation boards
Ampatex LDA 0.02 highly breathable airtightness membrane or Ampatex Variano variable vapour control membrane
Battens mechanically fixed to masonry walling, fully filled with SteicoFlex 036 flexible wood fibre insulation
12mm plasterboard
Interior
In terms of thicknesses and U-values, on pre 1945 buildings, the building regulations actually state that you need to achieve a U-value of less than 0.7 W/m2K even though a figure of 0.3 W/m2K is often mentioned. On a typical solid brick wall, the thermal performance can be seen in the table below:-
| Wood fibre board thickness | Batten depth, filled with SteicoFlex insulation | U-value achieved |
| 40mm | 25mm | 0.46 W/m2K |
| 40mm | 38mm | 0.39 W/m2K |
| 50mm | 0.36 W/m2K | |
| 60mm | 25mm | 0.38 W/m2K |
| 60mm | 38mm | 0.34 W/m2K |
| 60mm | 50mm | 0.31 W/m2K |
| 60mm | 63mm | 0.29 W/m2K |
This table gives a guide to the possible U-values achieved by the system and whilst it is possible to get to U-values lower than this, we generally would not recommend it. We would also suggest that using thicker insulation than this is not necessarily particularly beneficial and suggest reading our article on thickness versus benefit here.
Before using this system, please check with us that it is suitable for your project by filling out the contact us form so that we can run some simulations and confirm it.
So, on to the installation procedure:-
Services
It is generally best to remove the existing services from the surface of your walls. If wiring or plumbing is left in situ it is easily damaged by the fixings that are to be installed for the insulation and so the safest way to avoid electrical faults or plumbing leaks is to remove them from the surface of the walls. We run through the installation of the services below, once the insulation boards are in place.
Wall base
If the base of the wall is level with or very near ground level outside, it is likely to be quite moist. This can be an issue for wood fibre insulation in some circumstances and so it is best to run a minimum 200mm high row of the Multipor mineral insulation boards along the base first. These boards are made from a mixture of lime, sand and cement and whilst they are just as breathable and insulating as wood fibre, they have lower sensitivity to moisture.
Multipor boards are adhesively fixed to masonry (or firm lime or cement plaster) and cannot be bonded to gypsum plaster or any loose plasters. Therefore, it may be best to replace the plaster along the bottom of the wall with a robust hydraulic lime plaster, such as the Baumit RK39 if it is at all loose.
The RK39 layer should match the thickness of any plasters used above so that the Multipor boards line up with the wood fibre used above.
Step 1
Click play to activate the model, click the numbers for the annotations, full screen icon bottom right.
Firstly, if the walls are plastered with a lime or cement plaster, this can often be left in situ and insulation applied over the top. If the walls are cement and gypsum plastered the gypsum layer should usually be removed but the cement layer can be left as removing it often damages the masonry in the wall, making it much more difficult to fix into afterwards. Whilst cement plasters are not water permeable, they are actually fairly vapour permeable and are not usually a problem for the insulation system. However, if the plaster on the walls is loose and easy to remove, then it should be stripped back.
When retaining existing plaster any wall paper must be removed, the surface flattened and the surface should be washed down with a fungicidal wash to kill off the bacteria/moulds that live on the surface before enclosing them within the wall.
On to bare masonry brush the walls down and dampen the surface before applying the Baumit Viton Fein plaster or the plaster recommended in the NatureWall Suitability Confirmation document. If there are deep joints between stonework, use a simple hydraulic lime mortar to flush the surface up to reduce the amount of levelling plaster required. Use the thickness recommended and leave until it is green hard (can be dented with your finger nail easily but not your finger) before applying any boards.
Viton Fein is quite a high shrinkage type of plaster, meaning that as it dries it is very likely to crack. Fine cracks are not an issue but if more than 8-10mm is applied to the wall, the surface should be ‘rubbed up’ with a polyurethane float (often called a concreting float) to close up the cracks and prevent the plaster from lifting off of the surface. The thicker the plaster, the more often this will need to be done before the boards go on the wall.
The wall surface need not be completely plumb or flat as the battens can be used to create a flat, plumb surface if required. However, when you push the boards against the walls, there should be no air gaps behind them.
Fitting the boards
Lay the wood fibre boards in a brick pattern (or with at least 300mm staggers between vertical joints) and use two of the Fischer Termoz fixings per board to hold them in place, ideally evenly spaced down the centre line of the length of the board. The first row of boards should have the groove profile cut off and a strip of Ampacoll Komprimax joint sealing tape should separate it from any solid floors or where floorboards are not being lifted.
The insulation boards should be left to over-sail window/door openings by 25-50mm and once all of the boards have been fitted and fully fixed, neatly cut out the opening so that the boards are left flush with the inside of the reveal, ready to receive the reveal boards.
Step 2
Click play to activate the model, click the numbers for the annotations, full screen icon bottom right.
With the boards fitted, the window/door reveal boards can be installed. It is very important to seal the edges of the boards to the surface of the window with the Ampacoll Komprimax sealing tape.
Start by applying the Ampacoll Komprimax sealing tape to the entire perimeter of the window/door frame where the reveal boards will meet it. This ensures a good, airtight seal against the window/door frame even if the plaster cracks. Next apply a thin layer of Baumit StarContact White lime contact mortar to the surface of the masonry reveal and a thin layer to the back of the board, using a 20mm half round notched trowel.
The edge of the reveal board in contact with the UdiTHERM/BeltermoRoom board should be left clear of mortar. The edge of the UdiTHERM/BeltermoRoom boards around the opening should be liberally coated with a layer of the UdiSPECIAL ADHESIVE and the reveal board pressed into place. Make sure this compresses the Ampacoll Komprimax tape back down to its original size if it has expanded. This should be left for up to 48 hours to set fully. Try starting with the head of the opening first, then the sides and finally the sill area.
Step 3
Click play to activate the model, click the numbers for the annotations, full screen icon bottom right.
With all of the insulation boards on the interior of the wall in place and the reveal boards bonded in place, the next step is to install the airtightness membrane. Using the Ampacoll DT double sided tape, firmly apply vertical strips at roughly 1m centres and remove the release paper from the surface. Apply the membrane to the surface of the wall, firmly pressing with a roller or pressing aid on to the strips of Ampacoll DT to ensure that is sticks effectively to the surface of the boards. Ensure overlaps and laps are at least 100mm between the pieces of membrane and tape all of the joints with Ampacoll INT airtightness tape.
The dense wood fibre reveal boards can act as part of the air tightness layer and so the membrane can be trimmed around the opening and taped to the surface of the boards. Using the Ampacoll Fenax 40/60 tape, seal the edges of the membrane to the outer perimeter of the reveal boards, as in the model above. The corners of the reveal boards can also be taped with the same tape. The perimeter of the window frame can be taped with the Ampacoll Fenax 12/63 tapes. Ensure the taping around the window reveals is completed before installing battens to the edge of the opening as these will prevent you sealing the corners of the opening if it is not already complete.
Step 4
Click play to activate the model, click the numbers for the annotations, full screen icon bottom right.
Next, the battens are fixed back to the masonry at 600mm centres, using the Fischer DuoExpand frame fixings at around 2 per metre of batten. The windows are trimmed out with the batten, which is either angle fixed to the masonry or screw fixed to the other battens. Remember that these battens are picking up the plasterboard layer above so should not always be installed hard up to corners, particularly when meeting another battened wall.
At this stage any services should be installed within conduit, fixed to the sides of the battens and the position of back boxes should be confirmed. The 25 or 40mm SteicoFlex flexible wood fibre insulation can then installed between the 25mm or 38mm battens respectively, to completely fill the service zone. The membrane must not be punctured or if it is it should be repaired with sections of the Ampacoll INT tape.
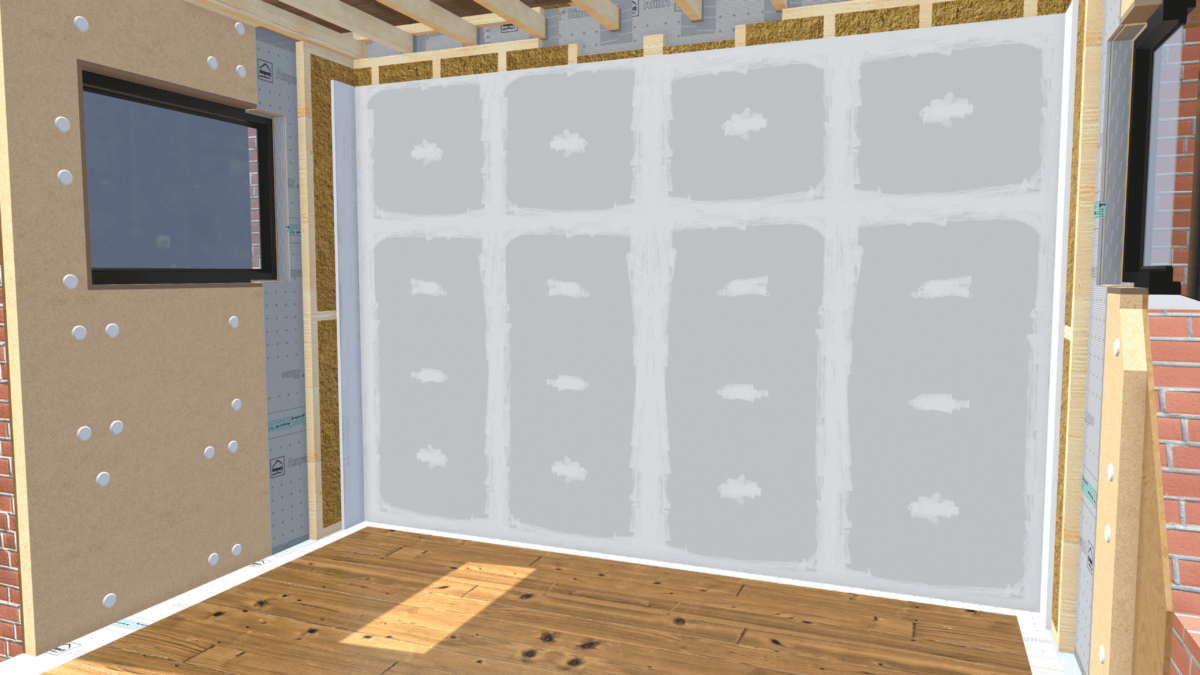
Step 5
In this final step, the 12mm plasterboard is fitted to the battens, in the usual way. When installing the plastic back boxes, be very careful not to puncture the airtightness membrane. Within the window reveals, the plasterboard would be screwed to the batten around the opening but glued, with construction adhesive, to the surface of the reveal boards. If space is limited, it is possible to prime the surface of the boards and plaster directly on to it with a gypsum plaster. Please note that the joints will all need reinforcing to avoid cracking.
What happens at internal wall junctions?
Strip back at least 600mm of plaster along the partition wall to accommodate the system thickness plus 500mm of reveal board. When you meet internal wall junctions, the wood fibre boards of the main system should be snuggly fitted/scribed into the corner to keep gaps to an absolute minimum. Once the membrane is fitted, this should be taped directly to the surface of the partition wall with the Ampacoll Fenax tape and primer if required. Using the Baumit StarContact White lime contact mortar as an adhesive, apply a thin layer to the back of a 20mm wood fibre reveal board and to the surface of the wall and push the two together to bond in place. You should come at least 500mm back along the return with the reveal boards.
Once the reveal boards are fitted, the battens can be fixed to the external wall, SteicoFlex fitted between and the plasterboard applied. On the partition wall we’d suggest you apply the plasterboard directly over the 20mm wood fibre reveal boards to keep the build-up as thin as possible and fix it using masonry screws. If adhesive is to be used it must fully coat the back of the boards as ‘dot and dab’ techniques should never be used.
You can see this explained in the model below:-
How does this fit in with the rest of the building?
(Click play to activate the model, click the numbers for the annotations, full screen icon bottom right.)
Here you can see how the suspended floor insulation joins up with the internal wall insulation, how it goes through the first floor and how it meets the roof or ceiling insulation. Please look carefully at the detailing around the first floor as this is important to the longevity of the joists.
You can see more information on the floor insulation here and the loft insulation here.
If you have any questions about this installation, please feel free to contact us.