SPECIFICATION GENERATOR
Find out which low impact materials are right for your building project.
External wall insulation – How to install plinth insulation and start wall insulation.
Here, using some simple 3d models, we look at how to instal the plinth insulation on your external wall insulation project.
Insulating the plinth area is vital to prevent heat loss through the bottom of your walls causing condensation and mould growth on the inner face of the walls. The specification that you’d use would be as follows:-
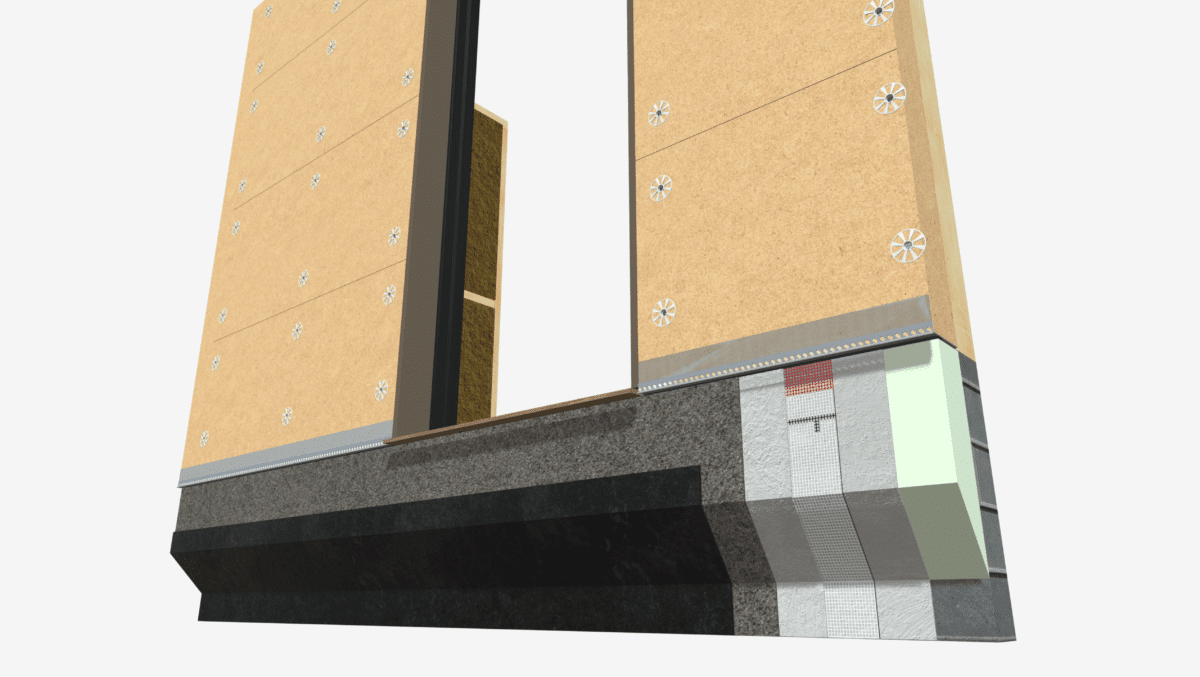
- Exterior
- 2mm Baumit SilikonTop finish render
- Baumit Premium Primer
- 6mm Baumit StarContact contact mortar, incorporating Baumit StarTex mesh
- Styrodur 2800C textured XPS insulation, mechanically and adhesively fixed to wall (thickness depends on insulation used above the plinth)
- Baumit StarContact contact mortar to level the plinth wall, if required
- Plinth walling
Here’s how to install it.
Step One
(Click play to activate the model, click the numbers for the annotations, full screen icon bottom right.) The first step is to clear the ground away from the plinth area, clean the surface of the wall and fill any surface imperfections so the wall is largely flat. The Styrodur XPS plinth boards are typically installed as 1200 x 300mm strips, with a tapered bottom edge as per the model, and the top of the board should be level with where the DPC protrudes.
The back of the boards should be fully coated with the Baumit StarContact contact mortar and then adhesively fixed to the wall. This prevents moisture from wicking up behind the board so is an important step. Once set (usually overnight), insert 3 fixings evenly down the mid-line of the board to improve the attachment to the wall.
If you’re working on a new building this process should be simple. If you’re working on an existing building and the XPS insulation boards will span over the existing DPC, a 25mm deep V-shaped groove should be cut out of the back of the boards where the DPC is which creates an air pocket over the DPC. This should not be filled with the adhesive as it is designed to prevent any moisture bypassing the DPC. Click on the model below to see how this is done.
Once the Styrodur plinth insulation is installed and the DPC laid over the top, the Ampacoll Komprimax joint sealing tape should be applied 5-10mm back from the outer edge to seal up against the underside of the starter track that is applied next. If there is no DPM, as would be the case for most existing buildings, this can be applied directly to Styrodur.
Step 2
The next step is to install the starter track which can be PVC or Aluminium. This should be finished flush with the door openings and mitred on the corners and pressed down so that it sits firmly on the Ampacoll Kompriax tape. This ensures there is a good seal underneath and prevent moisture and any insects from penetrating.
Step 3
The next step is to install the wood fibre boards. Start by cutting off the T&G profile from the bottom of the boards so that they are square and insert them into the starter track, tongues pointing upwards. Install the boards as shown in the model so that you have a single vertical butt joint in the corner which is achieved by installing all of the boards on each face of the building before moving on to the next. As you butt the boards on the next face up to these the joint must be well glued with the UdiSPECIAL ADHESIVE to ensure that cracks do not form in this area.
Step 4
The final step is to install the reveal boards around the door and render the plinth insulation. Start by applying the Ampacoll Komprimax tape on to the surface of the door frame and sill. Cut and glue, using the UdiSPECIAL ADHESIVE, the 20mm reveal boards into place, ensure they are firmly pressed against the Komprimax to create a weathertight seal.
Finally apply the render coats to the plinth area. This should be done with the Baumit StarContact contact mortar, incorporating the Startex mesh to form the base coat and it should extend down to the masonry wall as per the model. This prevents liquid water from getting up behind the plinth insulation.
Once this has cured for around 5 days the primer is applied to the surface and the SilikonTop finish render is applied to the surface. This should be left for a week or so and the Baumit DS26 Flex can be brush or trowel applied to the surface to create a waterproof surface, capable of withstanding even the strongest splash back.
The simplest way to create a neat line, just above the surface of the ground would be to use masking tape applied to the surface and left in place until the layers of slurry have been applied. This can then be removed to leave a neat line.
For more information on how to detail the wood fibre boards around openings, see Rendered window reveals in timber frame/new build, Rendered window reveals in masonry/existing buildings or Clad window reveals in timber frames.
If you want to learn more about how to install wood fibre insulation systems generally, feel free to head over to our free, online training site at Fibres. If you have any questions about this installation, please contact us